Parts of Daisy Wheel Printer
Published: 24 Oct 2025
Long ago, before laser and inkjet printers became common, there was a special printer called the Daisy Wheel Printer. It was loved for its clean and professional print quality. The secret of its smooth printing lay in its parts that worked together perfectly. By knowing the parts of Daisy Wheel Printer, one can understand how this old printing machine made words come alive on paper.
Overview of Daisy Wheel Printer Design
The design of a Daisy Wheel Printer is simple and smart. It is made of many parts that work together to print clean and clear text on paper. Each part plays an important role and helps the printer move smoothly during printing. The structure of the Daisy Wheel Printer shows how well it was built for high-quality printing.
Here are the main design points of Daisy Wheel Printer
- There is a Daisy Wheel that looks like a flower with many small petals and each petal has a letter or symbol.
- There is a Print Hammer that hits the petal of the daisy wheel and presses ink on paper to make a letter.
- There is a Ribbon placed between the wheel and paper that holds the ink for printing.
- There is a Motor that moves the wheel and helps the hammer work at the right time.
- There is a Paper Feed Mechanism that moves paper step by step to print each line.
- There is a Carriage Assembly that holds the wheel, hammer, and ribbon in one frame and moves side to side.
- There is a Control Circuit that sends signals to each part so the printer can print correctly.
- There is a Strong Outer Case that protects all inner parts and keeps the printer steady during work.
- There is a Simple Connection System that links the printer to a computer for easy control.
The design of this printer makes it look mechanical but it is easy to use and maintain. It prints one letter at a time but gives very neat results that look like typewriter text. This makes it perfect for tasks that need clean and professional printing.
Parts of Daisy Wheel Printer
There are many important parts that make the Daisy Wheel Printer work perfectly. Each part has its own duty and helps in printing clear and sharp letters on paper. The printer works step by step, and every part moves in a special way to complete the printing process. When all parts work together, the printer gives neat and clean output that looks professional.
In this, you will not only get information about 10 parts of Daisy Wheel Printer because the Daisy Wheel Printer has more than 10 parts. Now you will get complete information about all the parts of Daisy Wheel Printer.
Here are the main 20 parts of Daisy Wheel Printer explained in a simple way
- Daisy wheel
- Print hammer
- Ribbon cartridge
- Platen
- Carriage
- Stepper motor
- Drive belt
- Paper feed mechanism
- Tractor feed
- Printhead assembly
- Control board
- Power supply
- Housing/chassis
- Interface port
- Paper guide
- Sensors
- Gears and pulleys
- Ribbon advance mechanism
- Carriage return mechanism
- Microswitch assembly
1. Daisy Wheel
There is a round wheel that looks like a flower, and it has many small petals. Each petal has a letter or symbol. The wheel spins to bring the right letter in front of the hammer. When the hammer hits it, the letter prints on paper. This wheel is the main part that gives the printer its name.

2. Print Hammer
There is a small hammer that strikes the petals of the daisy wheel. It presses the ink ribbon against the paper to print a letter. The hammer works fast and prints one character at a time. It controls how strong and clear the print looks. This part makes every letter appear neat and sharp.

3. Ribbon Cartridge
There is a ribbon cartridge that holds the ink ribbon safely. It gives color to the printed letters. When the hammer hits the ribbon, ink moves to the paper. The cartridge is easy to replace and keeps the printer ready for work. It helps in keeping prints dark and clean.

4. Platen
There is a round roller behind the paper called the platen. It holds the paper tight when printing happens. The platen helps keep the paper smooth and straight. It also supports the printing pressure made by the hammer. This makes each print line look even and tidy.

5. Carriage
There is a moving part called the carriage that holds the daisy wheel and hammer. It slides from one side to the other while printing. The carriage helps letters appear one after another in a line. It moves with the help of the motor and belt. This part makes sure the printing stays straight and aligned.

6. Stepper Motor
There is a stepper motor that controls the movement of the daisy wheel and carriage. It turns in small steps to keep actions accurate. The motor helps the wheel rotate to the right letter. It also moves the carriage smoothly across the page. This part gives motion and life to the printer.

7. Drive Belt
There is a drive belt that connects the motor and the carriage. It helps the carriage move from side to side. The belt keeps the motion smooth and balanced. When the motor turns, the belt pulls the carriage in the right direction. It is a small but important moving part.

8. Paper Feed Mechanism
There is a paper feed system that moves the paper upward after each line. It makes sure that the paper stays in the right place. The feed works gently to avoid paper jams. It helps print each line clearly without overlap. This part makes printing easy and steady.

9. Tractor Feed
There is a tractor feed that helps move special paper with holes on the sides. It uses small pins to grip the paper. This keeps the paper from slipping during printing. It is mostly used for long or continuous paper sheets. This part is strong and very useful for clean printing.

10. Printhead Assembly
There is a printhead assembly that holds the hammer, wheel, and ribbon together. It is the main printing unit of the printer. The printhead moves along the page while printing letters. It makes sure each letter is printed in the right place. This part handles most of the printer’s work.

11. Control Board
There is a control board that acts like the brain of the printer. It sends signals to the motor, hammer, and wheel. It reads the data from the computer and controls printing steps. The board keeps all parts working in the right order. Without it, the printer cannot print properly.

12. Power Supply
There is a power supply that gives energy to the printer. It helps all electronic parts work safely. The supply converts electricity into the right amount for the printer. It powers the motor, control board, and lights. This part keeps the whole printer active and running.

13. Housing or Chassis
There is a strong outer body that holds all parts of the printer. It keeps dust and dirt away. The chassis gives support to the moving parts inside. It also protects the printer from damage. This part makes the printer safe, strong, and long-lasting.

14. Interface Port
There is an interface port that connects the printer to a computer. It helps send data easily for printing. The port allows quick communication between both devices. It can be a cable or plug system. This part is simple but very important for data transfer.

15. Paper Guide
There is a paper guide that keeps the paper straight when it moves inside. It stops the paper from bending or slipping. The guide helps print lines stay even. It makes paper handling smooth and safe. This part helps the paper move correctly through the printer.

16. Sensors
There are sensors inside the printer that check movement and position. They help the printer know where the carriage and paper are. The sensors prevent errors and jams. They send signals to the control board for better timing. These small parts help in accurate printing.

17. Gears and Pulleys
There are gears and pulleys that transfer motion from one part to another. They help the motor move the belt and carriage. The gears keep all movements balanced. They also control speed and direction. These parts keep the mechanical system running smoothly.

18. Ribbon Advance Mechanism
There is a ribbon advance system that moves the ribbon forward after every print. It makes sure the same ribbon spot is not used twice. This keeps printing dark and clean. The mechanism works automatically with the hammer. It helps in keeping the ribbon fresh for long use.

19. Carriage Return Mechanism
There is a carriage return system that moves the carriage back to the start after each line. It helps printing begin from the left side again. This movement is quick and automatic. It makes sure the next line starts in the right place. This part keeps the printing flow smooth and even.

20. Microswitch Assembly
There is a microswitch assembly that detects the end or start position of the carriage. It helps control the movement limits. The switch sends small signals to the control board. It keeps the printer safe from over-movement. This part makes printing accurate and controlled.

How the Parts Work Together
There are many parts of Daisy Wheel Printer, and they all work together like a small team. Each part has a special role that helps the printer make neat and clear letters on paper. When one part moves, the next part follows it. The full process is simple but smart, and it shows how well this old printer design worked.
Here is how the parts of Daisy Wheel Printer work together step by step
1. Control Board Receives Data
There is a control board that reads the printing data sent from the computer. It gives orders to all other parts such as the motor, carriage, and hammer. The board sends small signals that guide each step of the printing process. It works like the brain that keeps every part doing its job at the right time.
2. Stepper Motor Starts Moving
There is a stepper motor that begins to turn slowly in small steps. It rotates the daisy wheel until the right petal with the correct letter reaches the printing point. The motor also moves the carriage along the page. It keeps all movements steady and smooth for perfect printing.
3. Daisy Wheel Turns to the Right Letter
There is a daisy wheel that spins based on the signal from the control board. When it stops at the right character, the printer gets ready to print. Each petal on the wheel holds one letter or symbol. The wheel movement is controlled carefully so that the print stays accurate.
4. Print Hammer Hits the Petal
There is a hammer that quickly strikes the petal on the daisy wheel. The hammer presses the ink ribbon and paper together. This hit creates a letter on the paper surface. The hammer moves very fast and repeats this action for every new letter that needs printing.
5. Ribbon and Ribbon Advance Work Together
There is a ribbon cartridge that carries the ink ribbon. When the hammer hits, the ribbon leaves a mark on the paper. Then the ribbon advance mechanism moves the ribbon forward a little. This step keeps printing dark and clear because it uses a fresh part of the ribbon each time.
6. Platen and Paper Feed Move the Paper
There is a platen roller that holds the paper tight during printing. After one line is complete, the paper feed mechanism moves the paper upward. The paper moves in small steps to keep every line even. The tractor feed or paper guide helps in moving the paper smoothly without slipping.
7. Carriage Slides Across the Page
There is a carriage that carries the daisy wheel, hammer, and ribbon. It slides from left to right while printing each line. The drive belt and stepper motor control its motion. The carriage return mechanism then brings it back to the start for the next line. This helps in keeping the text in a straight line.
8. Sensors Keep Track of Motion
There are sensors inside the printer that keep checking the position of the carriage and paper. They tell the control board if everything is in the right place. The microswitch assembly also helps by detecting when the carriage reaches its end point. These small parts make sure printing stays accurate.
9. Power Supply Keeps the Printer Active
There is a power supply that gives energy to all the parts. It powers the motor, control board, sensors, and hammer. Without it, the printer cannot move or print. The power system works quietly but keeps every part ready and active.
10. Housing Keeps Everything Safe
There is a strong housing that covers all parts of the printer. It protects them from dust and outside damage. The housing also keeps vibrations low during printing. It helps all moving parts stay in place and work properly together.
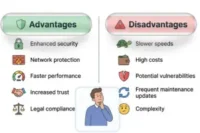
Advantages and Disadvantages of Parts of Daisy Wheel Printer
The Daisy Wheel Printer has different parts that make it work properly. Each part plays an important role in printing clear and sharp text. There are some pros and cons of parts of daisy wheel printer that help us understand their performance and maintenance needs better.
| Advantages of Parts of Daisy Wheel Printer |
|---|
|
| Disadvantages of Parts of Daisy Wheel Printer |
|---|
|
FAQs about Parts of Daisy Wheel Printer
There are many people who want to know how the parts of Daisy Wheel Printer work and what makes them special. These questions help beginners understand each part in a simple way. Here are some common questions with easy answers to help clear confusion.
There are parts like the daisy wheel, print hammer, ribbon cartridge, platen, carriage, and control board. Each part helps in printing clear letters on paper.
It is the main printing tool that has small petals. Each petal holds a letter or symbol that strikes the paper to form text.
It is a part that hits the daisy wheel petal to print a letter on the paper. It gives strong and clean impressions.
It has ink that transfers to the paper when the daisy wheel petal hits it. Without the ribbon, printing is not possible.
It is a roller that holds and moves the paper during printing. It helps keep paper steady for clear results.
It carries the daisy wheel and other parts from one side to another. It helps in printing each letter in the right place.
It manages all printer parts and gives them signals to work together. It is like the brain of the printer.
It controls the movement of the carriage and ensures smooth printing without shaking.
They detect the position of paper and moving parts. This prevents errors during printing.
Yes, most parts can be replaced easily. It helps in maintaining the printer for a long time.
Conclusion
It is clear that every part of Daisy Wheel Printer plays an important role in making printing clean and accurate. There are parts like the daisy wheel, ribbon cartridge, platen, and control board that work together to create high quality prints. These parts are designed to last long and can be replaced if needed. Although modern printers are faster, the Daisy Wheel Printer still shows how simple mechanical parts can produce perfect text printing. It is a great example of how teamwork between parts makes technology both useful and reliable.