How to Disable Laptop Keyboard in Windows 11 Without Software
Published: 10 Nov 2026
Is your laptop keyboard typing on its own, pressing keys by mistake, or getting in the way while you use an external keyboard? You do not need to download any software to stop it.
Windows 11 has built-in tools that let you disable the built-in keyboard safely. In this guide, you will learn 5 tested methods, about how to disable laptop keyboard in Windows 11 without software and which one is temporary and which one is permanent, and how to turn the keyboard back on if you change your mind.
Before you start, read the warning below. It will save you from getting locked out of your own laptop.
Before You Start: Do This First
1. Connect an external keyboard first.
Once the built-in keyboard is disabled, you will need another way to type. Plug in a USB keyboard or connect a Bluetooth keyboard and test that it works.
2. Keep the On-Screen Keyboard ready.
Press Windows + Ctrl + O to open the On-Screen Keyboard. You can click keys with your mouse if you need to type a password.
3. Do not disable the keyboard if it is your only keyboard.
If you have no external keyboard, use Method 6 at the end instead. It locks the keyboard for a few minutes without changing any settings.
Quick Comparison: Which Method Should You Use?
| Method | Permanent? | Windows Edition | Difficulty | Best For |
|---|---|---|---|---|
| Device Manager | No, returns after restart | Home and Pro | Easy | Quick test, temporary disable |
| PowerShell / PnPUtil | Yes, until you enable it | Windows 11 22H2 and later | Medium | Permanent disable, no Pro needed |
| Group Policy | Yes | Pro, Enterprise, Education only | Medium | Permanent disable on Pro |
| Command Prompt (i8042prt) | Yes | Home and Pro | Medium | Old laptops, PS/2 keyboards |
| Incompatible Driver | Yes | Home and Pro | Medium | When Disable is greyed out |
| BIOS / UEFI | Yes | Depends on laptop | Hard | If Windows methods do not work |
If you just want a quick fix, start with Method 1. If you want the keyboard to stay off after a restart, use Method 2 or 3.
Method 1: Disable the Keyboard in Device Manager (Temporary, Easiest)
This is the fastest method. It takes less than 2 minutes, and you do not need to install anything.
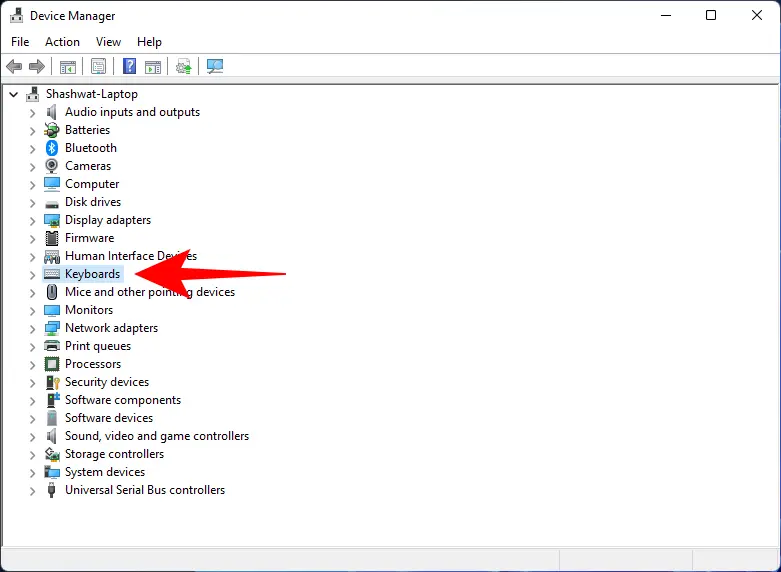
Steps
- Right-click the Start button and select Device Manager. You can also press
Windows + Xand choose Device Manager. - Find Keyboards in the list and click the small arrow to expand it.
- You will see one or two entries, usually Standard PS/2 Keyboard or HID Keyboard Device. The built-in keyboard is usually the PS/2 one. If you have an external keyboard plugged in, unplug it first so you can see which entry disappears.
- Right-click the built-in keyboard entry.
- If you see Disable device, click it and confirm. If you only see Uninstall device, click that instead.
- Test the keyboard. It should stop typing immediately.
Why this method is only temporary
Windows reinstalls the keyboard driver automatically when you restart the computer. That is why the keyboard often comes back after a reboot. If that happens, it does not mean you did it wrong. Use Method 2 or 3 for a permanent fix.
Method 2: Disable the Keyboard with PowerShell / PnPUtil (Permanent, Recommended for Windows 11)
This is the best permanent method for Windows 11 Home users, because Group Policy is not available on Home. It uses PnPUtil, a built-in Windows tool.
Steps
- Connect your external keyboard first.
- Right-click Start and select Terminal (Admin) or Windows PowerShell (Admin). Click Yes if Windows asks for permission.
- First, find your keyboard. Type this command and press Enter:
pnputil /enum-devices /class Keyboard /connected
- Look for the built-in keyboard in the list. Note its Instance ID. It will look something like
ACPIPNP03034&...orHIDVID_.... - Now disable it with this command. Replace the ID with your own:
pnputil /disable-device "ACPIPNP03034&..."
- Press Enter. You should see a message that the device is disabled.
- Test the built-in keyboard. It should not type anymore, even after a restart.
To turn it back on
Open PowerShell as Administrator again and run:
pnputil /enable-device "ACPIPNP03034&..."
Use the same Instance ID you used before.
Method 3: Block the Keyboard with Group Policy (Permanent, Windows 11 Pro Only)
If you have Windows 11 Pro, Enterprise, or Education, Group Policy gives you the cleanest permanent fix. Windows will not reinstall the driver after a restart.
Steps
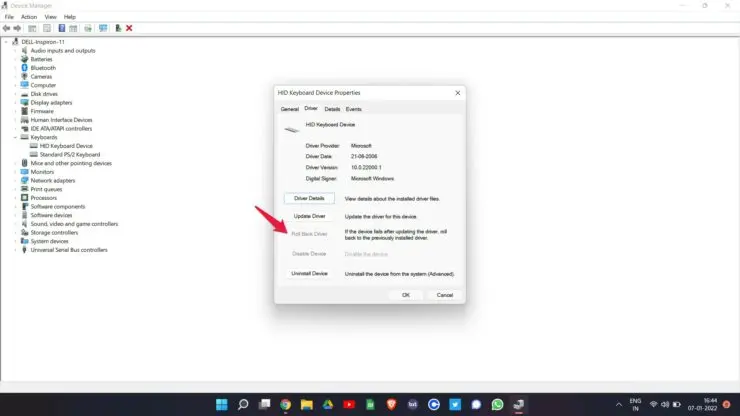
- Open Device Manager, right-click your built-in keyboard, and choose Properties.
- Go to the Details tab, select Hardware Ids from the drop-down, and copy the first value.
- Press
Windows + R, typegpedit.msc, and press Enter. - Go to Computer Configuration > Administrative Templates > System > Device Installation > Device Installation Restrictions.
- Double-click Prevent installation of devices that match any of these device IDs.
- Select Enabled, click Show, paste the Hardware ID you copied, and click OK.
- Now uninstall the keyboard in Device Manager as in Method 1. This time, Windows will not reinstall it.
To turn it back on
Open the same Group Policy setting and change it to Not Configured. Then open Device Manager, click Action > Scan for hardware changes, and the keyboard will come back.
Method 4: Disable the Keyboard with Command Prompt (Permanent, for PS/2 Keyboards)
This method works well on older laptops and on keyboards that show as Standard PS/2 Keyboard. It disables the PS/2 keyboard service.
Steps
- First, uninstall the keyboard in Device Manager as in Method 1.
- Press
Windows + S, typecmd, right-click Command Prompt, and choose Run as administrator. - Type this command and press Enter:
sc config i8042prt start= disabled
- You should see
[SC] ChangeServiceConfig SUCCESS. - Restart your laptop. The built-in keyboard should stay disabled.
To turn it back on
Open Command Prompt as Administrator and run:
sc config i8042prt start= auto
Then restart your laptop and scan for hardware changes in Device Manager.
Do not use this command if your keyboard is a HID keyboard only. It is mainly for PS/2 keyboards. If you are not sure, use Method 2 instead.
Method 5: Install an Incompatible Driver (When Disable Is Greyed Out)
On many laptops, the Disable device button is greyed out in Device Manager. This workaround fixes that.
- In Device Manager, right-click the built-in keyboard and choose Update driver.
- Select Browse my computer for drivers.
- Select Let me pick from a list of available drivers on my computer.
- Untick Show compatible hardware.
- Pick a driver from a different manufacturer, for example a random HID driver that does not match your keyboard.
- Click Next and confirm the warning. Windows will install the wrong driver, and the keyboard will stop working.
- Restart if asked.
To turn it back on
Go back to Device Manager, right-click the keyboard, choose Update driver > Search automatically for drivers, and Windows will install the correct driver again.
Method 6: Lock the Keyboard Temporarily Without Changing Settings
If you only need the keyboard out of the way for a few minutes, for example while cleaning it or while a child is near the laptop, do not disable anything.
- Press
Windows + Lto lock your PC. No one can type into your apps until you sign back in. - Or, shut down the laptop completely before cleaning the keyboard.
This is the safest option for cleaning. For a full cleaning guide, read our guide on how to clean a laptop keyboard without removing keys.
You may like this Post
Troubleshooting: Common Problems
The keyboard comes back after restart
This is normal for Method 1. Windows reinstalls the driver on boot. Use Method 2 or Method 3 for a permanent fix.
Disable device is greyed out
Use Method 5, the incompatible driver method, or Method 2 with PnPUtil. Some OEM drivers do not show a Disable button.
I disabled the wrong keyboard and my USB keyboard stopped working
Unplug the USB keyboard, plug it back in, and Windows should detect it again. If not, use the On-Screen Keyboard (Windows + Ctrl + O) to open Device Manager and enable the device again.
The keyboard types on its own even after disabling
This can be a hardware fault, liquid damage, or a stuck key. Try cleaning around the keys first. If keys are physically stuck, disabling in software will not fix a short circuit. Take the laptop to a repair shop.
I cannot type my password at login
Use the On-Screen Keyboard on the login screen. Click the Accessibility icon at the bottom-right and turn on On-Screen Keyboard. Then sign in and enable your keyboard again.
Which Method Is Best for You?
- For a quick test: Use Method 1, Device Manager.
- For Windows 11 Home, permanent: Use Method 2, PnPUtil.
- For Windows 11 Pro, permanent: Use Method 3, Group Policy.
- For an old laptop: Try Method 4, Command Prompt.
- If Disable is greyed out: Use Method 5, incompatible driver.
- For cleaning only: Use Method 6, lock the PC.
Most people only need Method 1 or Method 2. Start simple, and only move to the harder methods if the keyboard comes back.
Frequently Asked Questions (FAQ)
Here are some common FAQs about how to disable a laptop keyboard for beginner students.
Yes. You do not need third-party software. Device Manager, PowerShell with PnPUtil, Group Policy, and Command Prompt are all built into Windows 11.
No, usually not. Windows reinstalls the keyboard driver on restart. For a permanent fix, use PnPUtil or Group Policy.
Open Device Manager, find Keyboards, right-click the disabled keyboard, and choose Enable device. If you used PnPUtil, run pnputil /enable-device with the same Instance ID. If you used Group Policy, set the policy to Not Configured and scan for hardware changes.
Yes, if you have an external keyboard ready. It does not damage the laptop. You can always enable it again. Do not do it if the built-in keyboard is your only keyboard.
Some keyboard drivers do not offer a Disable button. In that case, choose Uninstall device, or use PnPUtil or the incompatible driver method in this guide.
No. The keyboard, touchpad, and mouse are separate devices in Device Manager. Disabling the keyboard will not stop your touchpad or external mouse from working.
Conclusion
You do not need to download any software to disable a laptop keyboard in Windows 11. Device Manager is enough for a quick, temporary fix. PnPUtil is the best permanent option for Windows 11 Home, and Group Policy is the best for Windows 11 Pro.
Always connect an external keyboard first, and remember how to turn the built-in keyboard back on before you disable it. That way, you will never get locked out.
If your keyboard is typing on its own, pressing keys by itself, or has sticky keys after a spill, disabling it is only a workaround. Clean it carefully or get it checked, because a hardware fault will not go away with a software setting.